
Professional dryer duct cleaning: what it is and when to schedule it
A dryer that suddenly needs two cycles to dry a single load of towels is rarely just an inconvenience. It is often the first visible sign that the duct carrying hot, moist air out of the machine is choking on lint, and a choked duct is a common mechanical cause of dryer-related house fires. Professional dryer duct cleaning is the targeted service that removes that buildup from the run between the back of the dryer and the outside termination, restoring safe airflow and predictable drying times.
This article walks through what a qualified service visit actually includes, how to decide whether you need one, what the work should cost, and the questions worth asking before booking. The goal is to help you evaluate a service the way a careful homeowner would, not to push a specific provider or schedule.
What professional dryer duct cleaning actually is
The phrase covers a narrow scope, which is worth pinning down before comparing providers. In a typical single-family home, a cleaning visit focuses on the dryer-side duct only: the flexible or semi-rigid transition hose behind the machine, the rigid metal duct in the wall or floor cavity, the elbow at the exterior wall, and the vent hood on the outside of the house. It does not normally include the rest of the home’s HVAC ductwork, which is a separate service.
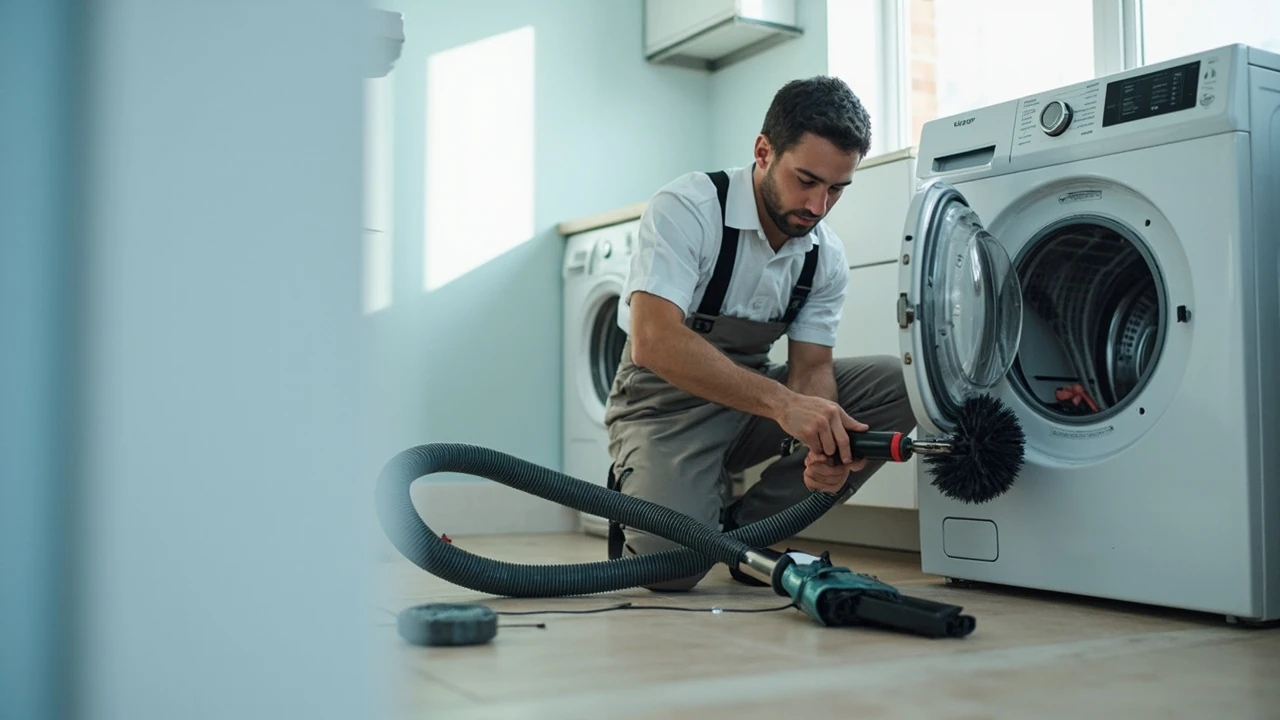
A complete visit usually involves four steps. The technician disconnects power and gas to the dryer, pulls the machine away from the wall, and inspects the entire run with a borescope or inspection mirror to check for crushed sections, gaps at joints, and heavy lint packing. They then run a rotary brush and a high-suction vacuum through the duct from the inside and outside ends, working in both directions so debris is pulled toward the vacuum rather than pushed deeper into the wall. After cleaning, they reassemble the run with a proper metal connector (foil tape, not screws through flexible plastic), confirm that the exterior hood flap moves freely, and test the dryer under a timed cycle to confirm that exhaust temperature and runtime are back to expected ranges.
Most single-story homes take 45 to 90 minutes. Homes with long duct runs, second-floor laundry rooms, or roof-mounted terminations take longer because the technician has to access the duct from the attic or roof. Visits that also include the home’s HVAC supply and return ducts are a different, larger service and are usually priced and quoted separately.
Why a choked dryer duct is worth taking seriously
The hazard profile is unusual because it combines three problems that reinforce each other: heat, fuel, and a confined space. Lint is highly flammable. The dryer’s heating element pushes air past 130°F at the back of the machine, and that same air passes over a lint screen that, by design, lets fine particles through. Over time, those fine particles accumulate on the interior walls of the duct, especially at elbows and at the exterior hood, where the vent screen and damper can trap additional fibers.
Once a duct is restricted, the dryer has to run longer and hotter to push the same amount of moisture out. Longer runtimes mean more heat inside the duct, more lint accumulation, and more thermal stress on the flexible transition hose, which is the most failure-prone part of any dryer vent system. According to the U.S. Fire Administration’s home fire safety guidance on clothes dryers, the leading contributing factor across documented dryer fires is the failure to clean the dryer and its venting, which is why the topic gets more attention from fire inspectors than its size would suggest.
The same restriction also raises energy use, shortens the life of the heating element and thermal fuse, and in gas dryers can allow combustion products to back-draft into the laundry area. None of these problems are visible from the laundry room, which is why periodic inspection matters more than waiting for a visible failure.
Signs that point to a cleaning rather than a repair
It helps to separate “the duct is dirty” from “something else is wrong with the dryer.” A small set of symptoms is a strong signal that the duct, not the appliance, is the issue.
- Clothes need more than one cycle, especially towels and jeans, even when the lint screen is clean.
- The exterior of the dryer, the wall behind it, or the laundry room feels noticeably warmer than usual during a cycle.
- The exterior vent hood does not push out a strong, warm column of air, or the flap barely moves.
- There is a burnt, dusty, or musty smell during or right after a cycle.
- The dryer itself is less than ten years old, has had normal use, and shows no error codes or unusual noises.
Symptoms that point elsewhere include a dryer that does not heat at all (likely a heating element, thermal fuse, or gas valve problem), a dryer that tumbles but produces no hot air, a loud thumping or scraping noise from the drum (bearings or support rollers), or a drum that does not turn. A cleaning will not fix any of these, and a technician who finds them should be willing to say so rather than upsell a vent service.
What a qualified service visit should look like
The difference between a useful cleaning and a wasted one usually comes down to a few procedural details. A homeowner who knows what good practice looks like is in a much better position to judge the work on the spot.
| Step | What should happen | What to watch for |
|---|---|---|
| Pre-inspection | Technician disconnects power, pulls the dryer, and inspects the full duct run with a camera or mirror | Skipping the inspection, or inspecting only the lint trap housing |
| Cleaning method | Rotary brush plus a high-CFM vacuum, worked from both ends where possible | Shop vacuum alone through the back of the dryer, which only clears the first 18 inches |
| Reassembly | Rigid or semi-rigid metal duct, foil tape at joints, smooth transition with no kinks | Reused plastic flexible hose, screws through foil hose, sagging or crushed sections |
| Termination | Exterior hood flap free, no bird nest or screen blockage, backflow damper working | Heavy exterior screen, broken damper flappers, duct ending into an attic or crawlspace |
| Test cycle | 10-15 minute timed load with a temperature check at the exterior vent | No test, or skipping the exterior airflow check |
Most national fire-safety guidance, including the U.S. Fire Administration’s dryer fire prevention recommendations, points to the same baseline: rigid or semi-rigid metal ducting, a short and straight run, a clean termination, and periodic cleaning. A service that leaves the home with plastic flexible hose, an uninsulated long run to the roof, or a missing exterior damper has not finished the job, no matter how clean the inside of the duct looks.
How often cleaning is actually needed
There is no single correct interval because the rate of lint accumulation depends on the household, the dryer, and the duct run. As a starting point, an annual inspection and cleaning is reasonable for most single-family homes. Households that do more than ten loads a week, have several pets shedding into the laundry, or run a long duct with multiple elbows accumulate lint faster and usually benefit from a six-month interval.
Renters and owners of older homes with semi-rigid aluminum or foil accordion hose behind the dryer should consider replacement at the same visit, regardless of how clean the duct is. The Consumer Product Safety Commission and the U.S. Fire Administration both recommend that flexible plastic or foil transition hose be replaced with rigid or semi-rigid metal, because plastic transition hose has been a recurring material in fire reports and is no longer permitted by most manufacturer installation manuals.
| Household profile | Suggested cleaning interval | Common extra work at the visit |
|---|---|---|
| 1-2 adults, no pets, short duct run | Every 18-24 months | Visual inspection only |
| Family of 4+, weekly loads above 8 | Every 12 months | Lint screen deep clean, hood damper check |
| Pet-heavy household | Every 6-12 months | Duct screen removal at the hood, possible replacement |
| Long run, multi-elbow, or roof termination | Every 12 months | Roof cap inspection, possible re-support of the duct |
| Rental property or shared laundry | Every 6-12 months | Full duct replacement evaluation, exterior hood service |
These intervals are practical guidelines, not a contractual schedule. A dryer that is suddenly slow to dry, hot to the touch, or producing unusual smells is its own signal and should be checked regardless of when the last visit was.
How much professional dryer duct cleaning costs
Pricing varies by region, duct length, and termination type, but a basic single-story visit with a wall-mounted termination in a metropolitan area typically lands in the $90 to $180 range. Visits that require a roof access setup, a long second-story run, or a duct replacement on top of the cleaning can run $200 to $400 or more. Pricing also depends on whether the technician has to pull and reset the dryer, which is sometimes billed as a separate line item.
A few patterns are worth knowing before requesting a quote:
- A flat-rate quote that does not depend on duct length, number of elbows, or termination type is a sign of a standardized service, which is fine for simple setups but can become inaccurate for complex ones.
- Time-and-materials quotes tend to be fairer on long or unusual runs because the technician is paid for the work, not a fixed menu item.
- Bundled air-duct-and-dryer-vent packages are common. The dryer portion of the package is usually a small share of the total, so the package price is only worth it if the rest of the home’s ductwork also needs service.
- Same-day or emergency pricing usually carries a premium and is rarely necessary for routine cleaning.
A clear quote should state the cleaning cost, any additional charges for roof access or long runs, the cost of any replacement parts such as transition hose or a new exterior hood, and the inspection fee if one applies. A technician who can answer these line items in advance is generally a more reliable choice than one who gives a single number and adds fees at the door. For an example of the kind of process description and scope detail a homeowner should expect from any service, this overview of air duct and dryer vent cleaning work in Rochester, NY walks through the steps a typical visit includes.
What to ask before booking
A short list of questions separates a careful service provider from a generalist handyman. The answers matter more than the order in which they are asked.
- What is the cleaning method, and will the duct be cleaned from both ends?
- Is the full duct run inspected with a camera before and after, and will the technician show the findings?
- What happens if the existing duct is plastic, foil accordion, or damaged, and is replacement part of the quote?
- Is the exterior termination on a wall or on a roof, and is roof access included in the price?
- Is the work warrantied, and for how long?
- Will the technician pull and reset the dryer, and is that a separate charge?
These are not trick questions. A technician who is comfortable answering them on the phone is more likely to do the work the same way. A technician who is vague about method, scope, or pricing is often vague about the visit itself.
Where DIY fits and where it does not
There is a useful middle ground between doing nothing and booking a full service visit. Homeowners with a short, wall-terminated run and a vacuum with a long hose can clear a portion of the buildup themselves. A reasonable homeowner pass involves pulling the dryer, disconnecting the transition hose, and using a flexible brush kit with a vacuum to clean the first few feet of the duct, then clearing the exterior hood of debris. A vacuum alone will not reach the middle of a typical 12- to 20-foot run, and a brush without a vacuum simply relocates the lint deeper into the duct.
DIY cleaning is not a substitute for a periodic service visit in three situations: long runs with multiple elbows, roof terminations that require ladder or roof work, and any duct that includes foil accordion hose, which is fragile and easy to tear. Falls from ladders and accidental damage to flexible hose are the most common homeowner injuries during dryer duct work, and a qualified service is usually less expensive than the medical bill or the repair that follows.
What homeowners can usefully do between service visits is simpler and often more impactful: clean the lint screen after every load, wash the lint screen with soap and water every few weeks to remove the film that blocks airflow, vacuum behind and under the dryer where lint collects, and avoid overloading the drum, which forces more fine particles past the screen and into the duct.
What the visit should leave you with
A good service visit ends with three things you can verify. First, an exterior vent that pushes a strong, warm, steady column of air during a timed cycle, with a damper flap that snaps shut when the dryer stops. Second, a duct run you can see: rigid or semi-rigid metal, foil-taped joints, no kinks, no sagging, and a proper connection at both the dryer and the wall. Third, a written record of what was done, including any parts replaced, the date, and the recommendation for the next visit.
If any of these are missing, ask before paying. A reputable service will come back and finish the work rather than argue about it, and the record of what was done is the basis for the next visit’s interval decision.
Choosing a service provider
The same service description can be carried out very differently by different companies, and a few practical checks make the difference clearer. Local providers with established addresses and verifiable reviews are usually a safer bet than out-of-area franchises that buy leads. Certification by a national body such as the National Air Duct Cleaners Association (NADCA) is a useful signal for HVAC ductwork, though dryer vent work is not usually covered by NADCA certification alone. References from neighbors with similar duct configurations are often the most useful signal of all.
Be cautious of door-to-door or cold-call offers that combine a “free inspection” with an aggressive upsell. A free inspection is a reasonable thing for a company to offer, but a visit that starts with a free estimate and ends with a high-pressure quote is not the same thing. The same advice applies to technicians who find unrelated problems in the home’s HVAC system during a dryer visit: a second opinion is reasonable when the diagnosis is unexpected.
Related work that sometimes comes up
Two adjacent topics come up often enough during a service visit that they are worth a brief mention, because a homeowner who knows about them is less likely to be upsold something unnecessary.
The first is HVAC duct cleaning, which covers the home’s heating and cooling ductwork, not the dryer duct. The two systems share a name and sometimes a service provider, but the equipment, scope, and cost are different. Dryer duct cleaning is small, fast, and focused on a single short run. HVAC duct cleaning is larger, slower, and usually priced by the number of vents, the square footage of the home, or both. A household that does not have dust, allergy, or airflow issues in the rest of the home usually does not need HVAC duct cleaning at the same time as a dryer visit.
The second is dryer vent rerouting, which is sometimes recommended when the existing run is too long, has too many elbows, or terminates in an interior space such as an attic or crawlspace. Rerouting is a real construction project, not a cleaning task, and is usually handled by a handyman, HVAC contractor, or remodeler rather than the cleaning technician. A reasonable next step when rerouting is suggested is a second opinion from a licensed general contractor, especially if the proposed run involves opening a wall or running duct through an attic.
A practical decision checklist
Use the list below as a quick reference at the point of booking. It is not exhaustive, but it covers the items that most often separate a useful visit from a frustrating one.
- Confirm the symptom before booking: drying time, exterior airflow, smell, and dryer age.
- Ask about the cleaning method, including whether the duct is cleaned from both ends.
- Ask about transition hose replacement, especially if the existing hose is plastic or foil accordion.
- Ask about the termination: wall or roof, and whether access is included.
- Ask for a written quote that separates cleaning, parts, and any access charges.
- Confirm the visit ends with a test cycle and a written record of the work.
If the answers to these questions are clear and consistent, the visit is likely to be a productive one. If the answers are vague or defensive, it is worth choosing a different provider.
Final reminders
A dryer duct is a small, hidden, and easy-to-ignore part of the home, which is exactly why it deserves periodic attention. The cost of a routine cleaning is modest compared with the cost of a service call for a failed heating element, the increase in energy use from a choked duct, or the much rarer but much more serious outcome of a vent fire. Most households benefit from a professional visit once a year, with shorter intervals for pet-heavy homes, large families, or unusually long duct runs.
The next practical step is to set a reminder for twelve months from the next cleaning, check the lint screen after every load, and keep the area behind the dryer clear so the next technician can pull the machine without moving a shelf. Those three habits, combined with a periodic service visit, cover the bulk of the risk and the bulk of the energy waste that a dryer duct can cause.
Frequently asked questions
How long does a professional dryer duct cleaning visit take?
Most single-story homes with a wall-mounted termination take 45 to 90 minutes. Homes with a long run, a second-floor laundry room, or a roof-mounted termination usually take longer because the technician has to access the duct from additional points.
How often should a dryer duct be cleaned?
Annual cleaning is a reasonable baseline for most households. Pet-heavy homes, large families, and homes with long duct runs usually benefit from cleaning every six to twelve months. A sudden increase in drying time, a hot exterior of the dryer, or a burnt smell is a signal to check the duct regardless of the schedule.
What is the difference between dryer duct cleaning and HVAC duct cleaning?
Dryer duct cleaning focuses on the short run between the back of the dryer and the exterior termination. HVAC duct cleaning covers the home’s heating and cooling ductwork. The two systems are separate, use different equipment, and are usually priced and quoted independently.
Can a dryer duct cleaning reduce the risk of fire?
Removing lint buildup from the duct reduces the fuel available for a vent-related fire and improves airflow so the dryer runs cooler. The U.S. Fire Administration identifies the failure to clean the dryer and its venting as the leading contributing factor in documented dryer fires, which is why periodic cleaning is part of standard fire-safety guidance.
What does a dryer duct cleaning cost on average?
Basic single-story visits in metropolitan areas typically run $90 to $180. Visits that require roof access, a long run, or replacement parts can run $200 to $400 or more. A clear quote should separate cleaning, parts, and any access charges.
Should the flexible hose behind the dryer be replaced?
Plastic or foil accordion transition hose is no longer recommended by most dryer manufacturers and should be replaced with rigid or semi-rigid metal ducting at the first service visit, regardless of how clean the inside of the duct is. Foil-taped joints and a smooth transition with no kinks are the standard a good service should leave behind.
What is the most common mistake homeowners make with dryer ducts?
The most common mistake is treating the lint screen as a substitute for periodic duct cleaning. The screen catches most of the lint but lets fine particles through, and those particles accumulate in the duct over time. A clean screen with a dirty duct is still a fire and efficiency risk.
Is a roof-mounted dryer vent termination harder to service?
Roof terminations are not harder to clean in principle, but they require safe ladder and roof access, which adds time, equipment, and cost to the visit. They are also more prone to bird nesting and to leaks at the roof penetration, so a periodic visual check from the outside is useful between service visits.
How do I know whether my dryer is the problem or the duct is the problem?
Slow drying with a hot exterior wall and weak airflow at the outside vent points to the duct. No heat at all, loud mechanical noises, or a drum that does not turn point to the dryer itself. A qualified cleaning technician will tell you which case you have before starting work rather than after.
What should I keep on hand to maintain the duct between service visits?
A spare lint screen, a flexible vent brush kit, and a vacuum with a long hose are enough to handle routine between-visit maintenance. Cleaning the lint screen after every load, washing it with soap and water every few weeks, and vacuuming behind the dryer are the highest-impact habits and cost nothing.






Leave a Reply